The Story of a Mom, a Wife a Small-Business-Owner-Hopeful (Happy Baby Designs) and a Craft Lover, trying to be present (not just exist) in my life with my children, my husband and myself. Follow along with me as I chronicle my crafting and business endeavors, my true life and some mommy moments along the way .


Showing posts with label home decor. Show all posts

Friday, May 27, 2011

Home Tour of Sorts

While we were visiting my family in Arizona last month, my dad and I took the kids to tour some amazing homes. Take a look at these beautiful rooms.

IMG_4706 IMG_4683 IMG_4686 IMG_4691 IMG_4693 IMG_4701 IMG_4703

Ok, so I tricked you a little bit ;) This was a museum of miniatures! These were all little dollhouse rooms. Aren’t they amazing? Nothing like the dollhouse I had when I was a little girl.

This one was my favorite. It was called “Yellow Rose of Texas” and it was staged for a wedding (did you see the wedding cake in the picture above?).

IMG_4688

IMG_4690

IMG_4694

IMG_4692

My daughter loved this “princess” shop :)

IMG_4699

They even had a Christmas village display. This was one of the kids’ favorites.

IMG_4678

Why is it we all love miniature things? They’re just so cute! But seriously, the craftsmanship that went into these rooms is ridiculous!

Monday, May 16, 2011

Books as Wall Art

As I was visiting my family in Arizona, my sister generously shared her room with me. And as I lay in bed each night and morning, I looked across the room at some book wall art that her friend (hi, Melissa!) made for her. And as any good blogger would do, I took lots of pictures of them so I could share this project with you all!

IMG_4708b

I realize that using books as wall art is not a new concept, however, I love the interest of this grouping and I think it’s really unique. Besides, it’s a great DIY project that you can personalize for any room and can match to any decor (and it’s cheap and easy, too!).

It looks really complicated, but once I inspected each book closely, I realized that if you can fold paper in half, you can do this project. These 3 books have special meaning to my sister but you could use any hardback books you find at Goodwill or garage sales. Also, she used some special wrapping paper my sister had purchased during her travels to Asia on the front and back covers. You could use any cute scrap book paper to match your decor and simply Mod Podge it to the covers.

Ok, now let’s talk technique (though you could really come up with your own way of folding each book).

Each of the pages in the top book is simply folded in half lengthwise.
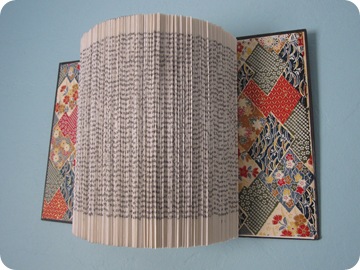
IMG_4709

The middle book is a little more complicated, but still, it’s just about folding paper.
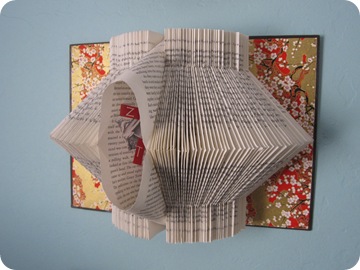
IMG_4710

Before you begin folding this one, find the center of the book and mark it with a post-it or paperclip. Starting on the left side of the book, fold one page in half lengthwise (just as you did in the top book). Then fold each of the corners of the next page in to the middle (as you can see below). Fold the next page lengthwise, and then next one with corners to the middle. Continue in this same pattern until you get to the middle pages that you marked.
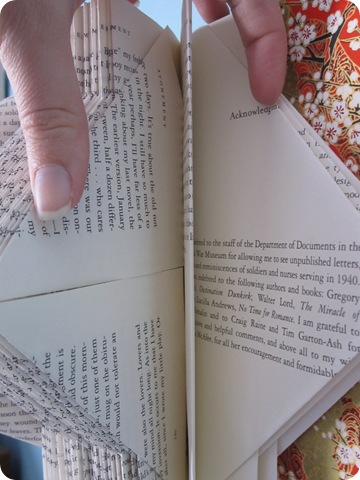
IMG_4713

When you get to the middle, skip folding the page lengthwise and fold each of the 2 pages that mark the middle toward each other so you can open them into each other to reveal an opening.
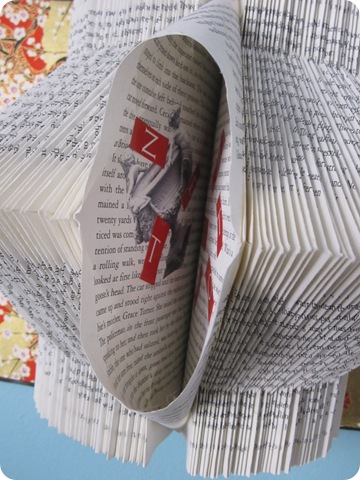
IMG_4711

You can put any kind of message, love note, pictures, words, whatever you want on the inside of this little peek-a-boo opening you’ve created.

Ok, now stick with me on the explanation for the bottom book. It’s difficult to explain but if you study the pictures, you will figure it out.

IMG_4714

Starting on left side of the book, fold 3 pages in half lengthwise. On the next page, (just as you did on the middle book) fold each of the corners to the middle of the page (toward the right side of the book). Then on the next page, fold the corners to the middle, only this time fold them toward the left of the book. So now your folds face each other, (they don’t go in the same direction like they did on the middle book). Next you want to unfold either the top or the bottom half, leaving the other half folded. And unfold the opposite (top or bottom) for the second page. Then fold 3 pages in half lengthwise and repeat this pattern until you reach the end of your book.

IMG_4715

IMG_4716

Update from the maker of these beautiful book sculptures:

A bone folder is really helpful. Also, if it is a thick book you can remove pages once you have filled out the book. I had to to that with the top one.

And there you have it. Simply folding pages. But the impact is so beautiful, especially for that book lover in your life.

To hang the book, she simply (and brilliantly!) used a plate hanger.

Thanks, Melissa for letting me deconstruct your beautiful Book Wall Art.

So what do you all think? Would you make something like this for your house? Have you used books to decorate your home? Tell us about it!


Linking up here:
Sumo Sweet StuffMakingPhotobucketThe Girl CreativeTip Junkie handmade projects http://linda-coastalcharm.blogspot.com/
Today's Creative Blog
Show and Tell with BCD

Saturday, March 26, 2011

White Walls…Boring or Chic?

As you know, I am slooooowly working on redoing my living room. One of my biggest issues with this room from a design perspective is that the room is fairly dark. There are 2 skylights, without which the room would feel like a cave. But other than when the sun is directly over head, the room is dark. I hate the color on the walls currently and I’ve been trying to figure out what color to paint them. Obviously, I want it to be a light color to brighten up the space. So I was thinking about white. But is that totally boring??? Or is it super chic??? I’ve never painted a room white before. I’ve always painted rooms with some color because I hated the white walls.

Here’s what the room looks like now (you can seen I’ve already been testing out some colors). Notice I’m finally building my globe collection!

IMG_3969

The other dilemma is this monstrous fireplace. It’s dark and stone and takes up this entire wall. (And yes, I realize that painting is up waaaay too high; I just threw it up on the existing nails to get an idea of what I want on that wall). Whatever color I choose has to go with this big stone wall. I’m not planning to paint it, but it could use a good scrubbing!

IMG_3968

You’ve seen the other side of the room from my side table, bookshelf and wreath projects.

IMG_3585

Here are some inspirational pictures from across blogland that make me think white walls are definitely the way to go!

White Room 6

{source}

White Room 5

{source}

White Room 7

{source}

White Room

{source}

White Room 2

{source}

White Room 3

{source}

White Room 4

{source}

So what do you think? I love the way you can use pops of color against white walls. I think my turquoise table, orange bookshelf and globes would be beautiful against a white background. Do you have white walls in your home? Is that by design or did you just inherit them when you moved in?

Tuesday, March 1, 2011

Bird on a Wire...er...Mirror

I am slowly starting to work on a makeover for my living room. Remember the love seat I want to slipcover? And the little turquoise side table I just completed? They're both part of my master plan for the living room makeover (ok, I have no master plan, I'm just kind of making it up as I go along). This is my newest little addition to the room.


One thing I'm trying to do is bring some color in to the room. Until now, I've felt like it was green on green on green. So here's how it looked after I added some pops of color with the turquoise table and the orange bookshelf...


Cute, but there was still something missing. I love the 3 round, antique mirrors hanging above the loveseat. They reflect the light nicely in this otherwise dark room. But the problem is, they don't add any color to that wall. So I decided to add this little touch of sweetness to one of the mirrors...


And here's how the space looks now...


It's not big impact, but it does add a nice little pop of color to that area...and it's super cute so how can you not love it? I also love using a wreath in an unexpected way.

I'm sure you've seen tutorials all over the place for how to make the felt flowers, but in case you haven't and you're interested, I'll give you a quickie!

Cut a circle (it works nicely if you do a couple of different sizes so your flowers are not all uniform).

Then start at one end and start cutting a spiral, making sure to leave a mini-circle at the end.

Take the end where you started cutting and start rolling.

When you get to the end (your mini-circle), put some hot glue on your flower and press the mini-circle down on to the flower. This will hold the flower together.
{Please ignore my chipping polish.}

Here are the 4 flowers that I made.

After making my purple yarn wreath (using the same method as my Christmas wreath), I simply hot glued the flowers on to my wreath.

I wish I could take credit for the little bird, but I bought it at a craft market from Revel Designs. Since I didn't want to attach the bird permanently, I just used some strategically placed straight pins to hold it in place. And since the wreath is up high, I don't have to worry about little hands messing with it so I think it's safe...I hope!

And here's one last look at it in all of it's cuteness...

Do you all use wreaths in unexpected ways to decorate your home?


Linking up to these awesome parties:

Show and Tell GreenHouseofHepworthsgiveawaysTransformation ThursdaylinkpartyPhotobucket Weekend Bloggy ReadingPhotobucket UndertheTableandDreaming