The Story of a Mom, a Wife a Small-Business-Owner-Hopeful (Happy Baby Designs) and a Craft Lover, trying to be present (not just exist) in my life with my children, my husband and myself. Follow along with me as I chronicle my crafting and business endeavors, my true life and some mommy moments along the way .


Wednesday, June 30, 2010

Paint, Goodwill and a Broken Toe

Part I - Paint

Yesterday at 6:30a I said goodbye to my husband and 2 children as they headed off for the airport. This is the first time my husband has traveled alone with the children and the first time I've stayed behind. I said my "goodbyes" and "I love you's" and by 6:35a my sister and I were moving furniture and getting ready for my big living room/dining room/guest room/craft room makeover.

By midday, the room went from dark and red...


To bright and primed...


It already looks 100% better! I can't tell you how happy I was to see the last of that red paint disappear.


Part II - Goodwill

To reward ourselves for our productivity, we ran a few errands and checked out a new thrift store, a Goodwill I hadn't been to and a Habitat for Humanity ReStore (which I was so excited to discover!). I picked up a few treasures...


I scored this awesome $5 table at Goodwill! I'm not sure where I will put it, but it's just calling out for a fun coat of paint.
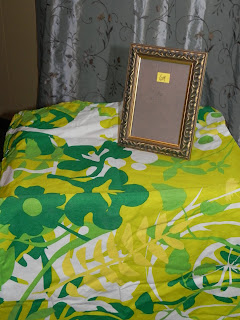

I picked up this $.69 frame at the thrift store. I think I'm going to use it to display one of my Great Grandma's brooches like I saw Barbara over at Hodge Podge do. The fabric is actually a pillow case, but I love the bright colors and pattern and I think it would make a really cute apron!


Part III - A Broken Toe

After running our errands and eating a quick bite of lunch, we got back to work on the room makeover. With the priming done, we started putting some color on the walls. It's hard to tell in the pictures, but it's sort of a blue/green color and I LOVE it! It looks so beautiful and fresh and bright (can you tell how much I hated that red paint?).


Around 10p we were finishing up the first coat of paint when my sister stubbed her right, pinky toe and broke it. :( So we had to cancel our pedicures for this morning and plans for the rest of the week have been put on hold (antique shopping, flea market, rearranging furniture). But this much is for sure - somehow, by the end of the week, I WILL have that room done! And at the very least, my sister will be there to keep me company while I do it! Stay tuned...


Linking up here...

Join  us Saturdays at tatertotsandjello.com for the weekend wrap up    party!

Photobucket
HookingupwithHoH
giveaways

Friday, June 25, 2010

Future Project Friday #10 & My Week Ahead

Hi everyone, TGIF! I'm a little late in my Future Project Friday post, but I've been working (outside the home, that is) and I swear, I am useless when I work!

So let's get on with it. I came across this guest post by Shannon from Shannon Makes Stuff over at Someday Crafts. She took a plain $3 T-shirt from Wal-Mart and turned it into this...


Isn't it so cute! I love it and I'm totally going to have to go buy a cheap T-shirt and give this one a try. Go check out her blog, too. She has a lot of fun projects and tutorials including a duct tape dress form that you have to check out.


My sister is in town this week to keep me company while my husband takes the kids to his family's house...by himself. I've never been without my kids before and I'm having mixed emotions about it. I'm really excited to have a mommy vacation, and it's going to be so much fun spending time with my sister. But....I'm going to miss my babies so much! (And my husband, of course :)

So, I have a TON of projects on the agenda while they're gone (I'm hoping that'll help keep my mind off the fact that I'm missing my family). Maybe we'll have time to make one of these CUTE T-shirts! The biggest project we're going to tackle is my living room/craft room makeover. I've been preparing for this makeover for awhile. Check out my Fabric Rack, Craft Tray, Lamp Transformations, and Fabric Wall Art. These are just some of the projects that will be incorporated in the room.

So here's one more "Before" picture before you see the beautiful "After".

Totally in need of a makeover, I know! Stay tuned!

Thursday, June 24, 2010

Winner!

Thank you to everyone who participated in my first ever Giveaway! And thank you so much to CSN Stores for generously giving one lucky follower a $40 Gift Card.

I know, I know, get to the winner! Using Random.org, the winner of the CSN Gift Card is......SUSAN! She had this to say "OH MY! Did you see the Texas A&M page. WOW! I woudl have to buy something from this section! Maybe flip flops or a bag to wear to our first family Aggie Football game in the Fall or a door mat or something. Did you see CSN has a leather TAMU couch...what???!!! Just wow!"

Well, Susan, I guess these beauties may soon be yours...


Thanks again to everyone who played along. I wish you all could've won! Maybe we'll have to have another giveaway when I hit 300 followers! :)

Sunday, June 20, 2010

DIY Fabric Wall Art

I saw this post over at Blue Cricket Design a while ago and I bookmarked it, not sure how/when/where I was going to use this idea, but I loved it! I am such a fabric addict and I loved the idea of displaying fabric on my walls.

I'm working on a living room/dining room makeover (remember this lamp, and this fabric rack, and even more lamps). I needed some big artwork to fill up the wall above my couch. I knew this wall art would be the perfect way to add color and texture...on a budget.

I found this tablecloth at Target that was marked down to $15.38. That might seem a little steep, but it's HUGE (60"x104"). I still have a TON of it leftover for future projects.


I went to Lowe's and found some pressboard that was 2" x 1" x 16' for $5.43. I had them cut 8 pieces at 20" each. Then I brought it home and using pilot holes, I secured each piece of wood together with screws. Here's what the frames looked like once they were put together.


Then I cut out my fabric, laying it out first, making sure the design I wanted would be centered in the frame. I ironed my fabric and then began stapling it to the frame. Just be sure to stretch it really tight when you staple it.


I trimmed the excess fabric and voila! Two large pieces of wall art for less than $10 each!


I haven't finished stapling the other canvas yet, so I guess you'll just have to wait for the final living room/dining room makeover reveal to see how it turns out ;)


Linking to these fun parties:

Join us Saturdays at tatertotsandjello.com for the weekend wrap up party!


Decor Mamma

giveaways

HookingupwithHoH
Photobucket

Make it Yours @ My Backyard Eden
Photobucket
Show and Tell Green
CreativeShareWednesdays


All Thingz Related
Visit thecsiproject.com
toolsareforwomentoo
mmm button
Making

Keeping It Simple

The Girl Creative

Photobucket